How to streamline your customer interviews with note taking and automated reporting

Interviews are a great way to get in-depth insight and promote empathy with customers. Customer interviews uncover a wealth of interesting moments, but sometimes it can be a challenge to capture or flag those moments when you’re fully engaged in the interview process. Additionally, analyzing those moments following the interview can be time-consuming if you have to re-watch the entire interview.
To help with this, we’ve built a solution for timestamped note taking and automated reporting that will help you:
- Quickly uncover trends across sessions: Effective note-taking helps you uncover trends across interviews, making it easier to pinpoint problem areas or questions where you’d like to dig deeper.
- Quickly share interesting moments: Because notes are timestamped it’s easy for you to quickly get back to interesting moments, create a clip, and share with your team.
- Focus on the interview: Because you can simply bookmark interesting moments during your interview, there’s no need for lengthy notes, allowing you to stay focused on the interview. Afterward, you can take your time reviewing and analyzing only the moments you’ve bookmarked without having to rewatch every minute.
Ready to get started? Keep reading or jump ahead to the sections below.
- Note taking during an interview or moderated usability study
- Automate a report by adding summaries of each session
Note taking during an interview or moderated usability study
Taking notes while asking questions and listening to what is being said can be challenging. That’s why it’s helpful to record your interviews so you can easily review the session later, and make clips and highlight reels.
Create a note-taking spreadsheet
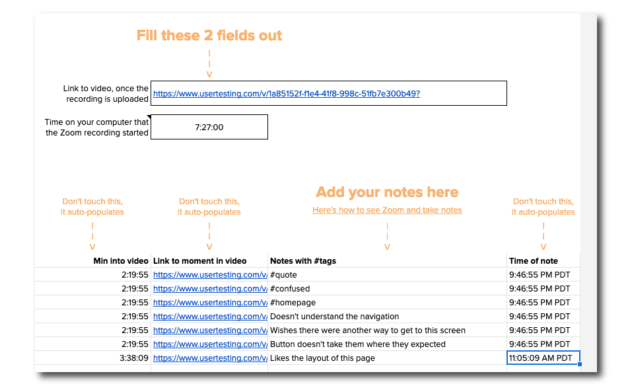
We also recommend taking timestamped notes during your interview, so it’s easy to identify exactly when an interesting moment happened. To do this, we recommend making a copy of this Google Sheet template which will automatically time-stamp these moments making it easy for you to find them when reviewing your videos.
Use a split screen during the interview
Once you have your note-taking spreadsheet set up, it’s helpful to arrange your screen so that you can see your interviewee on one side and your notes on the other.
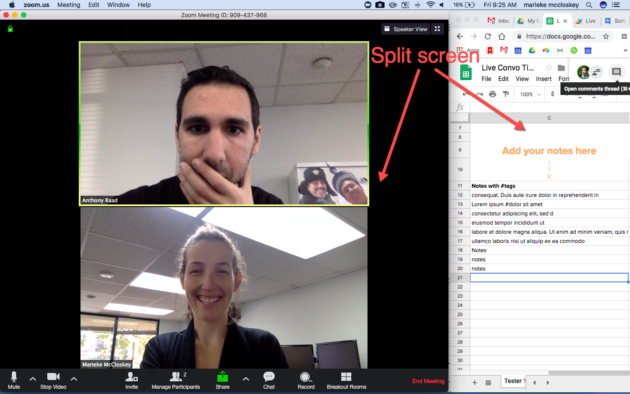
Alternatively, you can use two laptops—one for the conversation and one for note-taking.
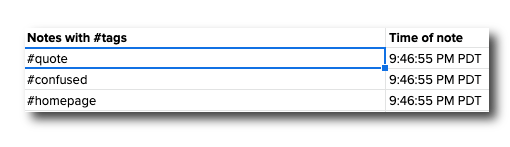
Use shorthand or tags
Once your screen and note-taking spreadsheet are set up you’re ready to start taking notes. We recommend using some sort of shorthand or tags to quickly flag key moments during your interview. For example, you can establish a standard set of tags beforehand to flag insights about observations, product elements, objectives, actions, or topics.
Using your note-taking spreadsheet, begin taking notes in column C whenever you’d like to flag an interesting moment.
You can learn more about tagging here.
Timestamp your notes
Once your interview is done copy and paste the URL for the video recording into the sheet and add the interview start-time and voila, you have timestamped notes that link directly to the moment in the video.
Complete these two fields once a link to your video recording is available. You can still use this spreadsheet, even if you don’t have a link to the recording online. Just leave the “Link to video” field blank, but fill in the session start time. You can then refer back to your local recording based on how the timestamp on your notes.
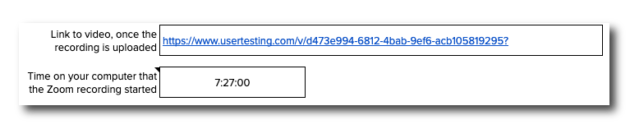
Complete these two fields once a link to your video recording is available. You can still use this spreadsheet, even if you don’t have a link to the recording online. Just leave the “Link to video” field blank, but fill in the session start time. You can then refer back to your local recording based on the timestamp on your notes.
After you’ve taken notes and synced the sheet up with the video, you can either refer to the time stamp or click on the link to open the UserTesting video player.
Recruit an interview buddy
The only thing better than taking notes yourself is having a colleague help take notes for you! This is a great way to build empathy across functions and empower others. At UserTesting, our Researchers frequently take on the note-taking role, while our Product Manager and Designers facilitate the customer interviews.
All you have to do is share your note-taking spreadsheet with your note-takers and instruct them to take notes in Column C.
Automate a report by adding summaries of each session
In addition to time stamping your notes, we highly recommend summarizing each session. This is a powerful way to get a comprehensive view of a series of interviews as a supplement to videos of key moments and additional details.
To help with this, we’ve created a template to help consolidate and summarize your notes. You can make a copy of it here.
Our template was built based on this incredible Design Sprint Scorecard by Douglas Ferguson from Voltage Control. Voltage Control’s scorecard is designed for multiple observers simultaneously taking notes on the final day of a Design Sprint. Our Live Conversation Scorecard works especially well to summarize several interviews with just one note taker for each session.
Here’s what you’ll need to input into your summaries template:
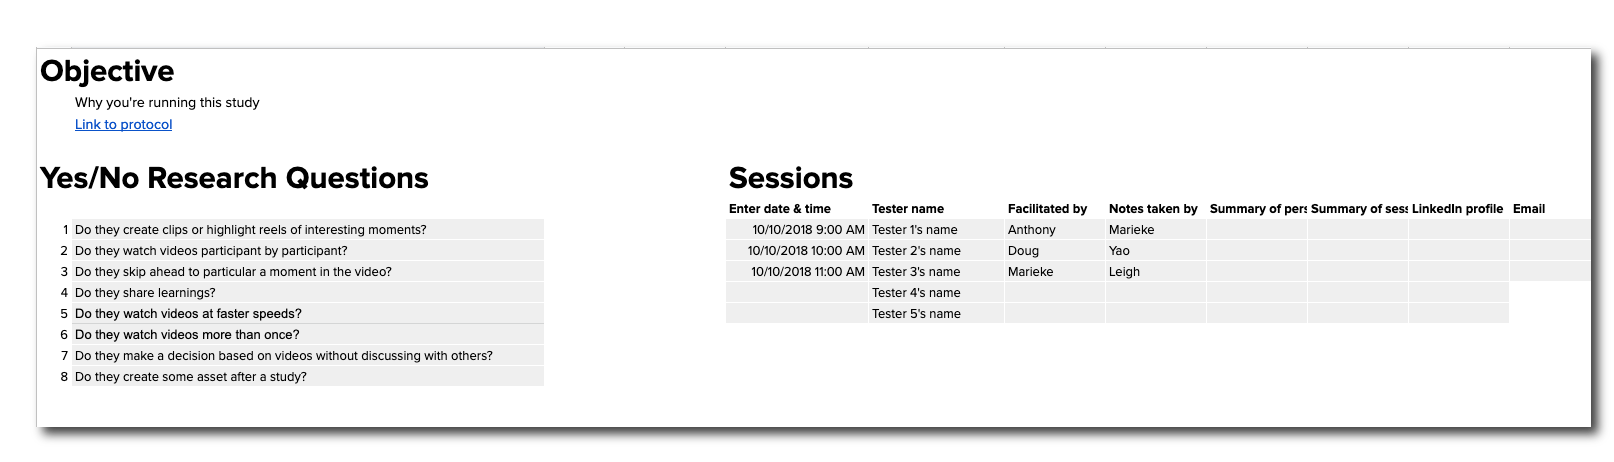
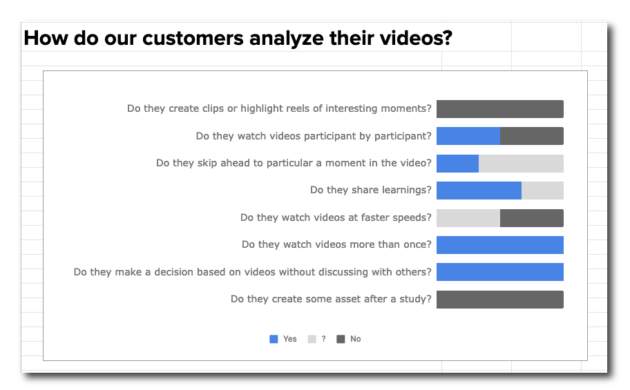
1. Objectives
In the first tab of the workbook, translate your objectives for the study to yes/no or multiple-choice questions. These aren’t the questions you ask people during the interviews, but the questions you and your team have.
For example, if you’re evaluating a prototype you probably have a couple of UI elements you’re especially interested in finding out if they make sense to users. For example:
- Used dropdown?
- Understood “Services”?
- Found way back to home screen?
2. Interview details
On that same first page, you can also note down details on the interviews, such as test participant names or interviewer/facilitator names. This information will automatically populate on all the other sheets.
3. Timestamped notes
Then for each person you talk to, take notes like described on the “Test participant 1”, “Test participant 2”, etc. tabs. You can always add more if you’re talking to more than five people.
4. Session summaries
After each session, take five minutes to answer each of the questions at the top. Remember these should be the most important things you’re trying to take away from the series of interviews—this isn’t a summary of everything you learned.
5. Automated report
Every time you complete an interview and answer the questions at the top, the spreadsheet updates the output tab. Once you’ve completed all your interviews the Output sheet provides an overview, or scorecard, of your key questions.
We want to hear from you!
Please reach out to user-science@usertesting.com for any questions or suggestions—we’d love to know how it goes if you use this!
Want to learn more?
If you’d like to learn how UserTesting can help you understand your customers through on-demand human insights, contact us here.
Get inspired
Even if you’ve conducted hundreds of studies before, getting started on a new research project can be complicated. Get an idea of all the pros, cons, and scenarios in which they work best before you begin.

Marieke is the founder and leader of UserTesing’s Product Insights Team, overseeing the company’s Data Science and UX Research efforts. She's spent over 10 years helping companies grow through human-centered design. Formerly a consultant at Nielsen Norman Group, she’s trained thousands of professionals on the value of gaining a deep customer understanding.